

December 6, 2017
Demolition Starts- July 8th
Three days after the house was delivered, Shane and the kids decided to tackle the kitchen demolition. Before they took down the wall studs that divided the kitchen, Terry had to confirm that the wall wasn’t load bearing and we were then clear to remove it, opening up the space.

Kitchen- View from Eat-In Area

Close Up Door Trim Detail

Saving the Door Trim

Alyssa in Demolition Mode

Shane Surveying his Demo
Gutting to the Studs
The rest of the kitchen demolition got underway August 6th when Shane started ripping up the linoleum and tearing down the lathe and plaster walls. We planned to add 3 more windows to the kitchen, while changing the layout of the existing 2, for 5 windows total. We consulted with Terry and he advised us to strip the 2 exterior walls back to the studs so he could frame in the new windows.
This meant removing the plaster, lathe, tar paper, 8″ fir ship lap board, and the insulation. By August 11th we had the walls open and cleaned up. Shane also had to remove the exterior X-90 siding as well. We salvaged some of the more intact ship lap boards and may try to re-use them in the basement as a rustic accent wall.


Removing the Flooring
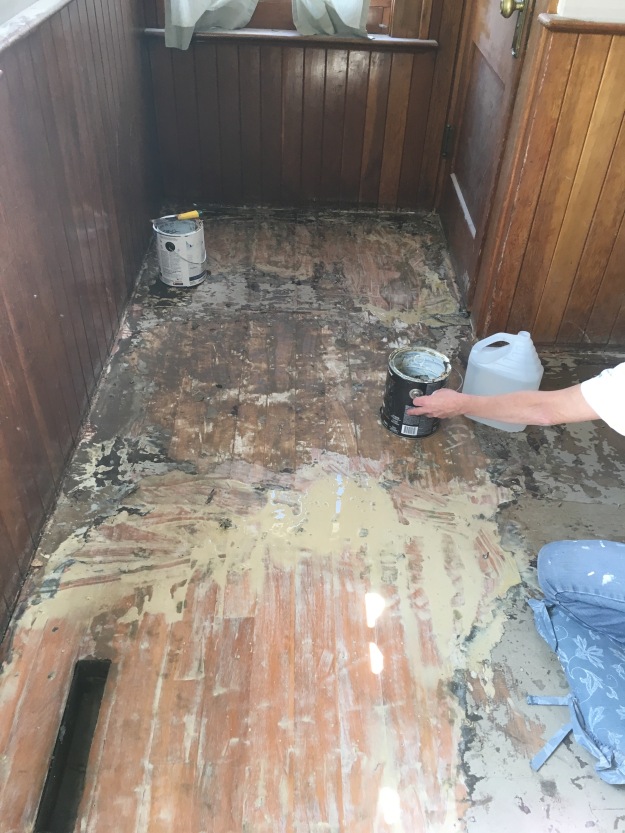
Removing the flooring took time, and it was hard work; the first layer was newer linoleum, it came up fairly easily when cut into large strips; it had been glued down. The second layer was a particle board sub-floor, this was nailed down. We used a combination of a potato fork and flat shovel to lift this up. The third layer was an older, 4′ x 8′ sheet linoleum, this was a b*tch; it was nailed down with many small sub-floor nails and it was also glued down….


It seemed to take a lot of effort to make progress on the floor; the older sheet linoleum would break off in small pieces when trying to remove it. Sometimes we got lucky and it would lift up in big chunks. And again, there were nails everywhere….

After the sheet linoleum was removed, we were left with nails and the paper backing from the linoleum still glued to the floor. We couldn’t see the nails very well; they were a safety hazard as it was very easy to step on them. The only way of removing them was pulling each one individually, and you had to find them by sliding a hammer on the floor until you ran into one.
We knew that there would be the original fir wood under all these layer- it ran into the kitchen from the dining room. But it was still covered in the glue and paper backing from the linoleum. A friend advised us to use vinegar and I am so grateful she did, it worked like a charm.
We generously doused a small area (2′ x 2′), ensuring that the paper was saturated with vinegar, and then had a 10 minute break. The chemical reaction between the vinegar and the glue needed time to process, otherwise you would just tire yourself needlessly scraping. We used 2″ putty knives to scrape the loose, goopey paper off. Any excess liquid we pushed onto the next area to start the chemical reaction again. It sometimes took 2 dumps of vinegar in a spot to get it clear of glue.
We only did this to the flooring in the eat-in kitchen, the flooring in the original kitchen area couldn’t be fixed.
Thankfully it was August and pickling season, so the grocery stores had lots of vinegar in stock and on sale. Our house ended up smelling like a pickle factory from all the vinegar.
Saving the Upper Cabinet
Right from day 1, I was firm that we would be saving the original upper cabinets in the kitchen; I thought they were the coolest thing ever. They were built lower to the counter-top, and the original base cabinets were a few inches lower than 36″ high.
Shane and I had different opinions about whether they should be painted or stripped back to the natural wood grain; I decided to compromise and try it his way. We started stripping paint on August 12th. The cabinets were not totally stripped and sanded until the beginning of September; my mom spent days while we were at work, stripping and scraping all the layers of paint off both sides of the doors.


And do you know what the sick thing is? We’re going to end up painting them. My mom initially said she would (kill/disown/never speak to me again) if we ended up painting the doors after all the hours she had spent on them. But it was her in the end, who admitted that they did need to be painted. The doors had taken a lot of beatings over 90 years, and it showed. We also were unable to completely remove all the paint from the doors; it had penetrated into the wood grain and showed up white against the wood, it looked fine from 8′ away, but up close it is very noticeable. There are also had a lot of holes from different hardware being installed over the years.
We did give the inside a fresh coat of paint and it really freshened things up, both in looks and smell. Once we moved in, I stocked the ‘pantry’, as I call the cabinets, to the gills; they hold a ton of food.


Putting Everything Back Together
Before we left for work in August, Terry came to finalize the new window layout. We knew we wanted one large window over the sink on the north wall, overlooking the garden and out to the hay-field, with two windows on either side of it. We also wanted two windows on the west wall, on either side of the stove.
Terry didn’t have a final measurement of the windows until he started framing, and figured out what would work based on the existing studs and our layout to keep things balanced. We ended up with 4 windows the same width (27″), and the large window at 44″ wide.
We placed the windows a few inches higher on the wall because we thought we needed to allow for outlets underneath the windows, but we didn’t end up doing that. There was plenty of room to have the outlets at the side of the windows. In retrospect, we could have had taller windows, but I do like the height of the windows in front of the sink. If they were lower the sink faucet would have been in the way when you went to open the window.


Terry also came through for us and built a proper set of stairs into the basement and stairs for the back door landing. These were a huge improvement for us; the previous rickety ladder wasn’t very safe.


With the windows framed, we were ready to put things back together. But first our electrician Matt had to install the new wiring for outlets and lights which took less than a day. As soon as he was done we were stuffing insulation, strapping the walls, and putting up a vapor barrier; finishing off with hanging drywall. Then the whole saga of mudding, sanding and painting began again. Thankfully we had re-reinforcements; Shane’s parent came down for two weeks from Snow Lake to help us work on the house.

Grandpa Getting a Hand from Mason

Electrician Matt Doing Some Wiring

Insulated and Strapped

Mason Trying Out the Elk Call

Shane Mudding
We were not able to use any of the original fir wood flooring in the kitchen as it had gone through too many renos and changes over the years; the floor boards were a broken patchwork of different woods and had lots of holes from the drain and water lines to fix. We decided instead on a weathered wood-look vinyl plank flooring, and installed a plywood sub-floor first for a solid base.
Then it was time for the kitchen cabinets; click on the next post for part 2 of our kitchen renovation.

Pingback: Sanding and Refinishing the Wood Floors – Shane and Bailey's House Renovation